This post is to illustrate that having strong IT policies in any organization is important. This seemed to be a case of broken configuration on the Exchange Server and the users were flooded with Spam email. The server had begun to take it’s last breath and it was time for us to come to the rescue and resuscitate it back to life.
A system admin has to take great care while putting a network into place and just setting up the Exchange Server in a secure is a daunting task. Though there are anti-spam measures in place, users started getting tons and tons of Viagra and Cialis mails. No one likes such personal emails in their official inbox, right? 😉 It all started when we used to notice a mild increase in spam, but Postini used to take care of it to a good extent. The only problem was email delivery had become slow. If you have noticed, once there is an outbreak of a certain kind of spam mails, it takes sometime before authorities step in and put a plug on it. Slowly, a particular type of spam reduces while an improved one starts pouring in and it keeps the techies busy 😦 😛
In our case, the spam being generated was from within the company network, rather than outside. A system or group of systems had been compromised and spam-bot made itself cozy in the Windows machine and started it’s job. Unfortunately, we couldn’t completely figure out how the system got infected and the root cause of all this. The server needed CPR and if we didn’t work on it immediately, the users would strangle us to death. The malware had taken over disabled accounts and started sending mails to everyone and also to unknown recipients. This resulted in a huge queue of postmaster mails wanting to try again and choking the network. The legit mails were stuck in the queue and was sometimes completely lost.
We had to work with Microsoft to get this under control. So, it was time to roll-up the sleeves and get the hands dirty.
1. Time to clear up the postmaster NDRs
He suggested using a handy command line tool called “aqadmcli.exe” This is a separate download and is used to search mails and delete them. Firing up the command line, we enter :
setserver “Servername” delmsg flags=sender,sender=sender@domain_name.com“
Searching the postmaster mails and deleting them used to still get back more spam. Delete 200 messages and we used to get a flood of 50. So, we immediately had to work on the firewall to get a breather.
2. Repair the chinks in the armor
Though the firewall is well configured, we had to tighten the security. Configured a rule so that only port 25 was open and only for Exchange. Any other app. wanting to try to talk using this port, sorry baby, you need to try a different tongue(read port). This helped in controlling the flood to a big extent and it was time to dress up the wounds on the server
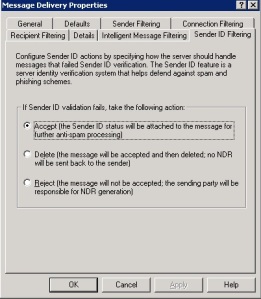
3. Sender ID filtering
We had Sender ID filtering in place
In case you want to enable this on your Exchange, please note that you should make sure that you have applied the hotfix mentioned in MS KB article: 905214 – Windows Server 2003 may stop responding when you enable Sender ID filtering on an SMTP virtual server in Exchange Server 2003 SP2.
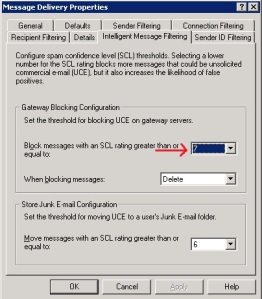
4. Intelligent Message Filtering
The Spam Confidence Filter was set to 7. We don’t want the filter to be too paranoid or too slack, so 7 fit the bill
5. Connection filtering-Using the good guys do the filtering for you
There are few sites out there that lists out domains, ISPs and spam mails which is blocked due to infection. Using Spamhaus Block List (SBL) on the Exchange helps to prevent spam at very early stages. Here is what Spamhaus has to say about SBL
“The SBL is queriable in realtime by mail systems thoughout the Internet, allowing mail server administrators to identify, tag or block incoming connections from IP addresses which Spamhaus deems to be involved in the sending, hosting or origination of Unsolicited Bulk Email (aka “Spam”). The SBL database is maintained by a dedicated team of investigators and forensics specialists located in 10 countries, working 24 hours a day to list new confirmed spam issues and – just as importantly – to delist resolved issues”
We configure the Block List Configuration to let Spamhaus do the work of filtering the messages.
Hit the Edit button and configure as below
Next, click on Return Status Code and choose the Match Filter Rule…….. and added few IPs from the 127.x.x.x range since few spam-bots are known to use these IPs to send out mails.
6. Recipient Filtering – The untapped power of Exchange in spam blocking
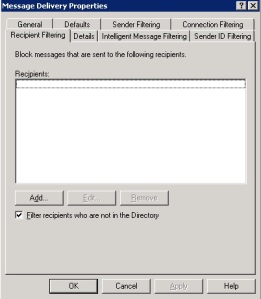
This is the primary setting which helped to cut-out on spam to a large extent. Remember I told that the bot was sending out mails from disabled accounts to few unknown accounts as well? After reading up a bit on Exchange, found that certain spammers send mail to users they hope exist in your domain, sometimes hoping to learn if they exist by reading NDRs generated by Exchange, and sometimes just sending to common names, or running through a dictionary of names. So, Johns, Bobs and Alices were hit with dirty emails real bad.
In Recipient Filtering, checking the “Filter recipients who are not in directory” This setting ensures that the bot which tries to send out mails to people who are not in the Directory is automatically deleted. Cool stuff, huh!? 😉
Bend the rules!
After making enough changes on how messages get delivered, it was time to let the server know how the SMTP protocol needs to be managed. Expand Servers–> Server Name –> SMTP –> Right click on Default SMTP Virtual Server and go to Properties. Next, went straight away to the Access tab
7. Authentication
In the Authentication, Anonymous access, Basic Authentication and Integrated Windows authentication are checked. Then going to the list of users from the Users button showed that there were few DLs and contacts part of this. Made sure that only Authenticated users and only Submit Permission was set to Allow
8. Connection control-You better know who talks to who
Back in the Access tab, hitting the Connection button takes you to another window. Here, we need to choose only which of the IPs will be able to communicate with each other. If you have different office sites setup, you can enter specific IP ranges from each site and also customer office IPs if required.
9. Relay-Kindly pass the message
Finally, we tell the server how to relay messages. Going to the Relay option in the Access tab, we again list specific IPs.
If by accident you choose the “All except the one below“, spammers can easily send mails through your server and flood to go to others. Your Internet connection might be severed until you set things right and that can mean a major unexpected downtime during business hours.
Disaster………..managed 🙂
Time to wipe your hands clean and get to another pressing issue. Just another day at the office 😉
P.S-I’m still very new to Exchange and got to learn a bit working on this. In case anyone finds mistakes, kindly point it out to me and I’ll be more than happy to edit the post accordingly.
Credits to MSexchange.org, Petri, Exchange Ninjas and other numerous exclusive Exchange sites which made me understand concepts a tad bit better 🙂


